
Desserts
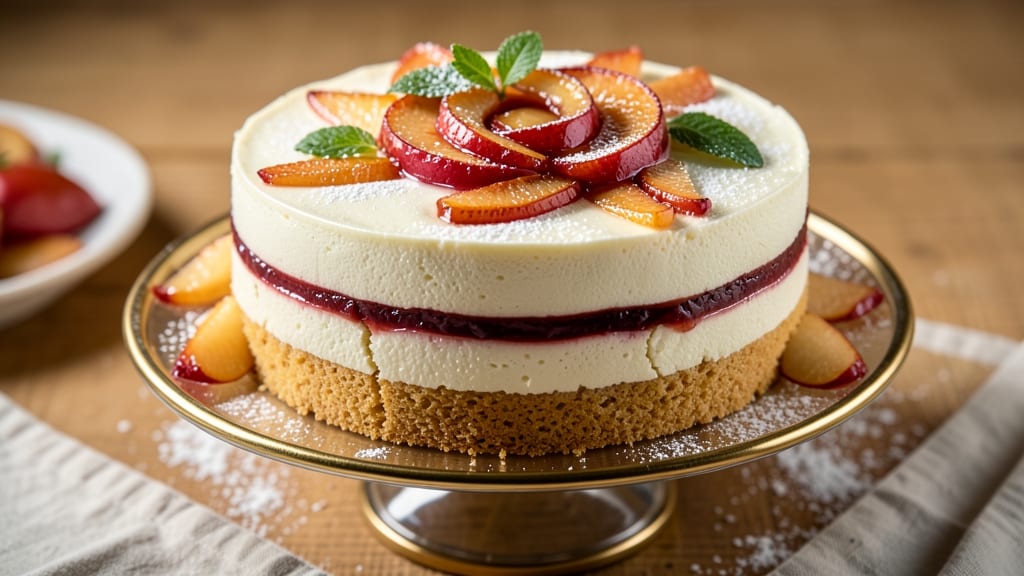
This apple mousse cake recipe delivers the perfect balance of crisp, buttery layers and silky apple mousse that feels like a hug in dessert form. 🌟 The secret lies in infusing vanilla into the cream, creating a flavor that's subtly sophisticated yet approachable for home bakers. I developed this recipe after years of testing—it's the one that finally earned me compliments from even the most discerning dessert lovers.
The cake itself is light and tender, baked just until golden, while the apple mousse filling transforms ordinary apples into a velvety, spiced center.
What makes this recipe stand out is how the flavors come together: the warmth of cinnamon in the mousse complements the vanilla cream, and the buttery layers provide just the right contrast. It's elegant enough for special occasions but simple enough for a weeknight treat.
By the time you're done, you'll have a cake that's visually stunning with its golden layers and creamy filling, yet surprisingly easy to assemble. The chilling process ensures clean slices with no mess, and every bite delivers that perfect harmony of textures—crisp crust, tender cake, and silky mousse.
This is dessert baking at its finest, with results that look and taste like they came from a patisserie.
The best part? This recipe scales beautifully for gatherings, and the components can be prepped ahead. Let's create something that will have everyone reaching for seconds—and maybe even thirds. Here's how to make it happen.
Ingredients for apple mousse cake
These 13 ingredients transform into a dessert that's light, creamy, and bursting with vanilla-spiced apple flavor.
| Ingredient | Amount | Notes |
|---|---|---|
| All-Purpose Flour 🌾 | 2 ½ cups | Sifted for light texture |
| Granulated Sugar 🍚 | 1 ½ cups | White or light brown |
| Unsalted Butter 🧈 | 1 cup | Cold, cubed for layers |
| Large Eggs 🥚 | 4 whole | Room temperature preferred |
| Pure Vanilla Extract 🌸 | 2 tsp | High-quality, no imitation |
| Baking Powder 🧂 | 2 tsp | Aluminum-free recommended |
| Salt 🧂 | ½ tsp | Fine sea salt preferred |
| Honeycrisp Apples 🍎 | 4 medium | Peeled, cored, finely diced |
| Ground Cinnamon 🌿 | 1 ½ tsp | Freshly ground preferred |
| Lemon Juice 🍋 | 1 tbsp | Freshly squeezed |
| Heavy Whipping Cream 🥛 | 3 cups | Cold, full-fat for stability |
| Powdered Sugar 🍚 | 1 ½ cups | For sweetening mousse |
| Vanilla Bean Paste 🌸 | 1 tbsp | For extra vanilla flavor |
The apples are non-negotiable here—Honeycrisp or Fuji are your best bets for that perfect balance of sweetness and tartness. Trader Joe's usually has great apples, but check the produce section for firm, vibrant fruit. I always grab extra because peeling and dicing them fresh makes all the difference. If you're short on time, pre-diced apples in the refrigerated section work in a pinch, but they lack that fresh-from-the-fridge brightness. For the butter, Land O'Lakes or Plugrá are my go-tos—they hold up perfectly when chilled for the layers. And that vanilla? Madagascar bourbon vanilla extract is worth the splurge for this recipe.
No honeycrisp apples? Gala or Pink Lady will work, but you might need to add a pinch more cinnamon to compensate for their milder flavor. Short on time? Applesauce (unsweetened) at half the amount can replace the diced apples, but you'll lose that lovely texture contrast. For the cream, heavy whipping cream is non-negotiable—light cream won't whip properly. If you're dairy-free, coconut cream chilled overnight works, but the flavor will be different. The powdered sugar should be 10X sifted for that silky mousse texture—don't skip this step unless you love gritty cake. And that vanilla bean paste? Walmart or World Market both carry good quality at reasonable prices.
The cake layers keep beautifully for 3 days wrapped in plastic, but the mousse should be made fresh the day you serve it—it's not one of those fillings that improves with time. Assemble the cake ahead and refrigerate it, then whip up the mousse just before serving. The apples? Store them in the fridge in a sealed container for up to 5 days, but use them within 2 days for the best texture. I always make a double batch of mousse—one for the cake, one for dipping fresh fruit on the side. It's that good.
Why You'll Love This Recipe
- No-Bake Magic: I swear, this cake comes together while you’re waiting for the coffee to brew. Just whip the butter and sugar until light, fold in the eggs one at a time (that’s the secret—don’t rush it), and layer it with store-bought applesauce or puréed apples. No oven, no stress, just layers of fluffy vanilla heaven.
- Vanilla-Apple Bliss: The buttery sponge soaks up the tangy-sweet apple mousse like a dream, and that vanilla extract? It’s the star—warm, rich, and just sweet enough to balance the apples. Honestly, the first bite makes me close my eyes. It’s that good.
- Weeknight or Weekend Star: Make it for a lazy Sunday brunch or a last-minute potluck—this cake travels well and doesn’t need reheating. Between us, I’ve even packed slices for work and had coworkers ask for the recipe. (Yes, even on a Tuesday.)
- Budget-Friendly Luxury: You’re using pantry staples here: flour, sugar, butter, eggs, and a splash of vanilla. No fancy ingredients, no markup—just pure, reliable dessert that tastes like it cost twice as much. Leftovers? They disappear faster than I can say “second slice.”
Step-by-step instructions for apple mousse cake
Here's how to create layers of tender cake and silky apple mousse that'll impress everyone!
👨🍳 Step 1: Make the Apple Mousse Filling
In a medium saucepan, combine the finely diced 4 medium Honeycrisp Apples with 1.5 cups Granulated Sugar and 1 tbsp Lemon Juice. Cook over medium heat for 10-12 minutes until the apples break down completely and the mixture thickens into a jam-like consistency. You'll know it's ready when it coats the back of a spoon smoothly.
Remove from heat and stir in 1 tbsp Vanilla Bean Paste and 1.5 tsp Ground Cinnamon. Let this cool completely to room temperature before using - this prevents the mousse from melting later. I like to spread it on parchment paper and chill for 30 minutes while I prepare the cake layers.
🍳 Step 2: Bake the Cake Layers
Preheat your oven to 350°F. In a large mixing bowl, cream together the 1 cup Unsalted Butter and 1.5 cups Granulated Sugar until light and fluffy - about 3-4 minutes with an electric mixer. Add the 4 whole Large Eggs, one at a time, mixing well after each addition.
In a separate bowl, whisk together the 2.5 cups All-Purpose Flour, 2 tsp Baking Powder, and 0.5 tsp Salt. Gradually add this dry mixture to the butter-sugar-egg combination, alternating with 2 tsp Pure Vanilla Extract, beginning and ending with the flour mixture. Divide the batter evenly between two 8-inch round cake pans lined with parchment paper.
Bake for 20-25 minutes or until a toothpick inserted into the center comes out clean. Let the layers cool in the pans for 10 minutes, then transfer to a wire rack to cool completely. I find using a serrated knife to level the tops gives a more professional finish - just trim any domed edges.
🥘 Step 3: Prepare the Vanilla Cream
While the cake layers cool, prepare the vanilla cream by whipping the 3 cups Heavy Whipping Cream in a chilled bowl until soft peaks form. Gradually add the 1.5 cups Powdered Sugar and continue whipping until the cream holds stiff peaks. This should take about 3-4 minutes with an electric mixer.
In a small bowl, mix together 1 tbsp Vanilla Bean Paste and 1 tbsp Lemon Juice. Gently fold this mixture into the whipped cream until fully combined. The cream should be smooth and glossy - if it looks curdled, you've overmixed. Cover and refrigerate until ready to use.
🥧 Step 4: Assemble the Cake Layers
Place one cake layer on a serving plate. Spread an even layer of the apple mousse over the top, leaving about ½-inch border uncovered. This ensures each bite has that perfect balance of cake and mousse. Repeat with the second cake layer.
Spread the vanilla cream evenly over the top layer, then gently press down with a spatula to create a smooth surface. I like to swirl the cream slightly with a knife for a decorative touch. Finally, chill the assembled cake in the refrigerator for at least 4 hours - this allows all the flavors to meld together beautifully.
Pro Tips For Making Apple Mousse Cake
- Whisk Eggs Room-Temp: Cold eggs from the fridge won’t blend properly—your mousse will end up lumpy or under-emulsified. Pop them in warm water for 5 minutes first, then whisk vigorously until the yolks and whites are pale and ribbon-like. Trust me, that extra 10 seconds of effort makes the difference between a cake that holds and one that collapses.
- Sift the Flour Twice: Apple mousse cake relies on a light, airy crumb, and clumpy flour ruins that. Sift the all-purpose flour directly into the butter-sugar mix, then sift it again after adding the dry ingredients. I learned this the hard way—my first batch had a dense, cakey texture that tasted more like a muffin.
- Don’t Overmix the Batter: Once you fold in the apples (or apple purée), stop mixing the second everything’s just combined. Overworking the batter introduces too much air, which can cause the cake to sink as it bakes. Use a spatula and lift the batter gently—it should have a few small streaks of flour, not look like pancake batter.
- Chill the Cake Pans: Grease your pans with butter, then pop them in the fridge for 10 minutes before baking. Cold pans help the edges set faster, preventing a gummy or uneven rise. I skipped this once and ended up with a cake that looked like it had a molten center—even though it was fully baked. (Yes, it’s annoying to wait, but it’s worth it.)
Make-ahead tips for leftovers
Cake Layer Prep
Bake your cake layers 1 day ahead for the best results. Once completely cooled, wrap each layer individually in plastic wrap and store in an airtight container at room temperature.
The flavors develop beautifully overnight, and the cake stays moist without drying out. I always label them with the date—this cake keeps perfectly for 3 days this way. 💫
Mousse Prep
Make the apple mousse 1 day before assembly but wait until serving day to whip the vanilla cream. Store the cooled apple mousse in a sealed glass container in the fridge—it stays fresh for 2 days.
The cream, however, is best whipped fresh the morning of serving to maintain its light, airy texture. I keep the heavy cream chilled overnight in the fridge for perfect whipping consistency. ✨
Assembly Timeline
Assemble the cake 4-6 hours before serving to allow the layers to set properly. Wrap the assembled cake tightly in plastic wrap and refrigerate. This chilling time ensures clean slices and prevents the mousse from sliding around.
For a party, I often assemble it the night before—it actually tastes even better after resting overnight! 🌟
Make-Ahead Serving
Slice and serve the cake directly from the fridge for perfect texture. If you need to transport it, wrap individual slices in parchment paper and place them in a cake carrier box. The mousse stays stable for up to 4 hours outside the fridge, making it ideal for potlucks.
I always bring extra mousse in a small container for dipping fresh fruit on the side. 🥧
Freezing Option
You can freeze the assembled cake for up to 1 month, but the texture will be slightly denser after thawing. Wrap it tightly in plastic wrap, then in aluminum foil, before placing in a freezer bag.
Thaw overnight in the fridge before serving. The cake layers remain tender, though the cream may lose some of its lightness. I only recommend freezing if you absolutely need to—fresh is always better! ❄️
Garnish Prep
Prepare any garnishes 1 hour before serving. Fresh berries, mint leaves, or a dusting of powdered sugar add beautiful finishing touches. Store garnishes separately in the fridge until ready to use.
I like to make a simple caramel sauce (just heat ½ cup sugar and 2 tbsp cream together) to drizzle over slices just before serving for extra wow factor. 💛
Nutrition facts
Frequently asked questions
Can I substitute applesauce for fresh diced apples in the mousse?
You can use ½ cup unsweetened applesauce to replace the diced apples, but the texture will be less vibrant and the flavor more muted. For best results, stick with fresh apples—they create that perfect jam-like consistency that makes the mousse so special. If you must use applesauce, add an extra ½ tsp cinnamon to compensate for the lost flavor complexity.
How do I prevent the cake layers from cracking when baking?
Cracking usually happens when the oven temperature fluctuates or the batter is too wet. Always preheat your oven to 350°F for at least 15 minutes before baking. Use room-temperature eggs and butter, and don't overmix the batter—just combine until just combined. For extra insurance, bake the layers in water baths (place pans in a larger pan with hot water halfway up the sides).
Can I make this cake without a stand mixer?
Use a hand mixer or even a whisk for the whipped cream and butter-sugar mixture. For the cake batter, whisk vigorously by hand for 5-7 minutes to achieve the same light texture. The key is patience—just keep mixing until the butter is pale and fluffy. You might need to rest your arm, but the results will be just as good!
Why did my vanilla cream turn grainy or separate?
This usually happens when the cream isn't cold enough or was overmixed. Always chill your mixing bowl and beaters for 15 minutes before whipping. Use cold cream straight from the fridge, and stop mixing as soon as you see stiff peaks form. If it starts to curdle, try adding 1 tsp powdered sugar and gently folding it in—this often helps stabilize the texture.
What's the best way to serve this cake for a special occasion?
For a restaurant-worthy presentation, dust the top with powdered sugar and garnish with fresh berries or mint leaves. Serve slices on elegant plates with a side of extra mousse for dipping. I also recommend adding a drizzle of warm caramel sauce (just heat ½ cup sugar and 2 tbsp cream together) right before serving for that final touch of sophistication.