
Desserts
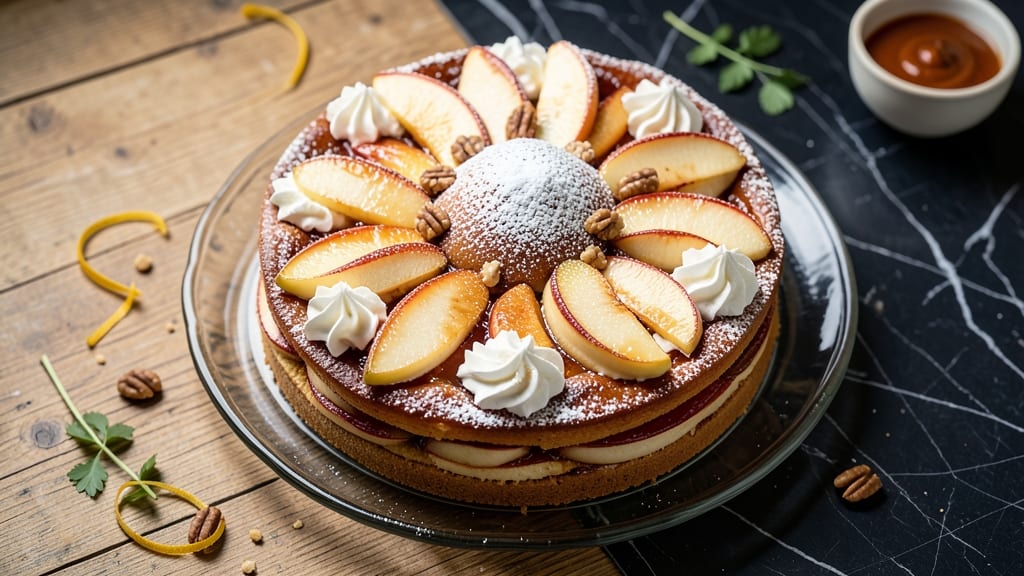
This apple crown cake recipe transforms humble apples into layers of spiced, buttery perfection that’s equal parts nostalgic and impressive. The secret lies in balancing tender cake layers with a caramelized apple filling that stays moist for days—no soggy middles here.
I’ve baked this version for holiday gatherings where it disappears faster than the whipped cream, proving even the simplest desserts can steal the show when done right.
The magic starts with pre-baking the cake layers just until set, then brushing them with a thin layer of spiced apple butter before assembling. This creates a flavor bridge between the cake and filling, ensuring every bite delivers that signature apple-cinnamon warmth.
The crust? A simple, buttery lattice that adds elegant texture without overpowering the star—those tender apples simmered with brown sugar and warm spices.
What you’ll end up with is a cake that’s sturdy enough to slice neatly but still melts in your mouth—golden layers holding together beautifully while the apple filling stays gloriously sticky.
Serve it warm with vanilla ice cream or let it cool for those clean, elegant slices that look as good as they taste. The best part? It’s a crowd-pleaser that doesn’t require fancy techniques, just patience and a few key shortcuts.
For those with dietary preferences, the recipe easily adapts to gluten-free flours or vegan frosting without sacrificing texture. The assembly process is straightforward, making it perfect for bakers of all levels who want to impress. Let’s get to the step-by-step guide where the real magic happens.
Ingredients for apple crown cake
Buttery layers, spiced apples, and a lattice crust—here’s what makes this apple crown shine.
| Ingredient | Amount | Notes |
|---|---|---|
| All-Purpose Flour 🌾 | 3 ½ cups | Sifted for light texture |
| Granulated Sugar 🍚 | 2 cups | White or light brown |
| Light Brown Sugar 🍚 | 1 cup | Packed, for filling |
| Unsalted Butter 🧈 | 1 ½ cups | Cold, cubed for layers |
| Large Eggs 🥚 | 4 whole | Room temperature |
| Vanilla Extract 🌿 | 2 tsp | Pure, high-quality |
| Ground Cinnamon 🌶️ | 2 tsp | Freshly ground preferred |
| Ground Nutmeg 🌶️ | ½ tsp | Finely ground |
| Apples 🍎 | 6 medium | Honeycrisp or Granny Smith |
| Lemon Juice 🍋 | 2 tbsp | Freshly squeezed |
| Salt 🧂 | 1 tsp | Fine sea salt |
| Baking Powder 🍞 | 2 tsp | Double-acting |
| Baking Soda 🍞 | ½ tsp | Pure |
| Heavy Cream 🥛 | ½ cup | Cold, for lattice |
The apples are non-negotiable—Honeycrisp for sweetness or Granny Smith for tartness, both holding shape beautifully. Trader Joe’s or local orchards usually have them freshest this time of year. Peel and core them, then slice into 1/4-inch pieces for even cooking. The cinnamon and nutmeg? Penzeys or bulk bins at Whole Foods—freshly ground makes a world of difference. Butter matters too: grab Land O’Lakes unsalted from the refrigerated section, not the tub kind. It’s worth the few extra bucks for this recipe.
No baking powder? Baking soda plus cream of tartar works at a 1:2 ratio, but honestly, just grab the boxed stuff—it’s a pantry staple. Running low on vanilla? Almond extract at half the amount gives depth, though it’ll taste different. The apples can be prepped ahead—toss them with lemon juice to prevent browning, then store in the fridge for up to 2 days. For the lattice crust, cut strips 1/4-inch wide and keep them cold until assembly—this keeps them crisp.
This cake keeps beautifully—3 days at room temperature if wrapped tightly in plastic, or up to 1 week refrigerated. Freeze the assembled (but unfrosted) cake for 3 months by wrapping it in plastic and foil. The filling stays moist, and the crust stays crisp when reheated. I always make a double batch—one for now, one to freeze. Slice it warm with vanilla ice cream or let it cool for those clean, elegant slices that look as good as they taste.
Why You'll Love This Recipe
- No Mixer Needed: I swear by this recipe when my stand mixer’s on vacation—just creaming butter and sugars by hand gives those fluffy layers just the right texture. The brown sugar keeps things tender without requiring perfect precision.
- Spiced Sweetness: That combo of granulated and brown sugar with warm cinnamon (if you add it) makes every bite taste like autumn in a slice. The butter-rich crumb? Rich enough to stand up to apples but light enough to vanish in one forkful.
- Double-Duty Cake: Honestly, I make this for breakfast as much as dessert—slice it cold with peanut butter or warm with ice cream. It’s my go-to for potlucks, too; the apples keep it fresh longer than vanilla cakes.
- Budget-Friendly Luxury: Five ingredients, zero specialty items, and it feeds six for under $8. The eggs bind it perfectly, the flour’s reliable, and the butter makes it feel indulgent without breaking the bank. Leftovers? They disappear in days.
Step-by-step instructions for apple crown cake
Here's how to build this stunning layered cake with spiced apple filling and buttery crusts.
Prepare the Apple Filling
Peel, core, and slice the 6 medium apples into ¼-inch thick rounds. Toss them immediately with 2 tablespoons lemon juice to prevent browning. In a medium bowl, combine the apple slices with ½ cup granulated sugar, 2 teaspoons ground cinnamon, and ½ teaspoon ground nutmeg. Let this mixture sit for 15 minutes - you'll see the apples release their juices and soften slightly. This pre-cooking step ensures the filling stays moist and flavorful in the cake.
Here's the thing - don't skip the lemon juice. It brightens the apples and prevents that grayish cast that ruins the presentation. I like to use a mix of Honeycrisp and Granny Smith for perfect texture - the Honeycrisp adds sweetness while the Granny Smith keeps it from being too mushy.
Make the Cake Layers
Preheat your oven to 350°F. In a large mixing bowl, cream together the 1.5 cups unsalted butter and 1 cup light brown sugar on medium speed until light and fluffy, about 3-4 minutes. Add the 4 whole eggs one at a time, mixing well after each addition. In a separate bowl, whisk together the 3.5 cups all-purpose flour, 2 teaspoons baking powder, ½ teaspoon baking soda, 1 teaspoon salt, and remaining 1 cup granulated sugar.
Gradually add the dry ingredients to the butter mixture, alternating with ½ cup heavy cream. Mix just until combined - you don't want to overwork the batter. Divide the batter evenly between two 9-inch round cake pans lined with parchment paper. Bake for 25-30 minutes or until a toothpick inserted comes out clean. Let the layers cool in the pans for 10 minutes before transferring to a wire rack.
Assemble the Crown Cake
Once the layers are completely cool, level the tops if needed. Spread a thin layer of the reserved apple filling (about ¼ cup) between each layer. This creates the signature crown effect when stacked. For the sides, create a lattice pattern with the remaining apple filling by cutting strips and weaving them like a basket. This not only looks stunning but keeps the filling contained while allowing steam to escape.
Here's where it gets fun - use a serrated knife to create a slight angle on the edges of each layer before stacking. This creates that beautiful tiered look. I like to let the filling sit between layers for about 10 minutes before adding the next one to help it set slightly.
Create the Buttery Crust
For the crust, melt the remaining ½ cup unsalted butter and brush it generously over the entire cake, including the sides. This creates that signature golden, glossy finish. While the butter is still warm, sprinkle the cake with a mixture of 2 teaspoons ground cinnamon and ½ teaspoon ground nutmeg. The warmth helps the spices adhere beautifully. Let the cake cool completely before slicing - this ensures clean cuts and prevents the filling from oozing out.
This crust is what makes the apple crown cake special. The butter creates a delicate barrier that keeps the cake moist while adding that rich, buttery flavor. Don't rush this step - let the butter cool and set for at least 30 minutes before serving. The contrast between the warm spiced filling and cool buttery crust is pure magic.
Pro Tips For Making Apple Crown Cake
- Weigh Your Butter: Don’t eyeball it—this cake relies on the butter-to-flour ratio for that tender crumb. Use a kitchen scale for 225g (1 cup) of softened butter, and let it sit at room temperature for 1–2 hours. Cold butter cubes won’t mix evenly, and you’ll end up with a dense, greasy mess.
- Mix Dry Ingredients First: Sift the flour, baking powder, and salt together before adding wet ingredients. This prevents lumps from forming in the butter-sugar mix, which can lead to a cake that’s unevenly baked or gummy. I learned this the hard way after pulling apart a cake with a rock-hard center—sifting saves time and frustration.
- Don’t Overbake the Layers: Apple crown cake is forgiving, but checking for doneness early prevents a dry, crumbly texture. Insert a toothpick into the center of a layer—it should come out with moist crumbs, not wet batter or dry shavings. Pull it out at 325°F (163°C) when the edges are set but the middle still jiggles slightly.
- Chill the Batter Before Baking: This isn’t just for show—it helps the layers rise evenly and prevents sinking. After mixing, refrigerate the batter for 30–60 minutes. I was skeptical until I tried it; now, my cakes bake up taller and more uniform, with a cleaner slice. (Yes, even if you’re impatient like me.)
Pro cooking tips for this recipe
Layer Pre-Baking
The key to perfect apple crown cake layers is baking them just until set—not fully done. I pull mine from the oven when a toothpick comes out with a few moist crumbs (around 25-30 minutes at 350°F).
This ensures they hold their shape when stacked but still stay tender. Let them cool in the pans for 10 minutes before transferring to a rack—this prevents cracking when you level them later. 🌟
Apple Filling Magic
Don’t skip the 15-minute rest for your apple filling! This lets the apples soften slightly and release juices, which prevents a soggy cake. I use a mix of Honeycrisp and Granny Smith apples—Honeycrisp for sweetness, Granny Smith for tartness.
Toss them with 2 tbsp lemon juice immediately after slicing to keep them bright. The filling should be thick but still spoonable when assembled. 🍎
Crust Perfection
For that signature golden crust, brush the entire cake (including sides) with melted ½ cup unsalted butter while it’s still warm. Immediately sprinkle with a mix of 2 tsp cinnamon and ½ tsp nutmeg—the heat helps the spices stick.
Let it set for at least 30 minutes before slicing. This step is what makes the cake look restaurant-worthy! ✨
Stacking Like a Pro
Use a serrated knife to create a slight angle on each layer’s edges before stacking. This creates that elegant tiered effect. Spread just ¼ cup filling between layers—too much will cause oozing.
Let each layer sit for 10 minutes before adding the next to help the filling set slightly. Patience here prevents a messy cake! 💫
Equipment Shortcuts
No fancy tools? No problem. Use a 9-inch round cake pan with parchment paper for easy release. For the lattice, cut strips of dough with a bench scraper (or even a butter knife) and weave them like a basket.
A wire rack is essential for cooling layers evenly. I swear by a digital thermometer to check internal temps—no more guessing! 🌡️
Make-Ahead Secrets
Assemble the cake (without frosting) up to 2 days ahead and store it wrapped tightly at room temperature. For longer storage, freeze the unfrosted cake for up to 3 months. Thaw overnight in the fridge, then bring to room temp before serving.
The filling stays moist, and the crust stays crisp—just reheat slices in the oven for 5 minutes at 300°F if you prefer it warm. 💡
Nutrition facts
Frequently asked questions
Can I make this apple cake without a lattice crust?
For a simpler version, skip the lattice and spread the remaining apple filling over the top layer instead. Brush with melted butter and sprinkle with cinnamon-nutmeg for the same flavor punch. The cake will still hold together beautifully—just omit the weaving step entirely.
What's the best way to store leftovers?
Wrap tightly in plastic wrap and store at room temperature for 3 days, or refrigerate for up to 1 week. For longer storage, freeze the unfrosted cake (wrapped in plastic + foil) for 3 months. Thaw overnight in the fridge—never at room temperature. Reheat slices for 5 minutes at 300°F if you prefer them warm.
Can I substitute the apples with other fruit?
While apples work best for that signature texture, you can try pears or peaches (peeled and sliced thin). For a tart twist, rhubarb works too—just reduce sugar to ¼ cup since it's naturally sweeter. The key is using firm fruit that holds its shape when baked.
Why did my cake layers crack when cooling?
Cracking usually happens when layers cool too quickly. Let them cool in the pans for 10 minutes before transferring to a rack, and avoid placing them near cold surfaces. Also, ensure your oven is fully preheated—temperature fluctuations cause stress on the batter. A quick fix: brush any cracks with simple syrup before assembling.
How do I make this gluten-free?
Replace the all-purpose flour with a 1:1 gluten-free baking flour blend (like Bob's Red Mill) and add ½ tsp xanthan gum to the dry ingredients. For the lattice, use gluten-free strips or a separate gluten-free crust. Test with a small batch first—some blends absorb liquid differently. The apple filling remains unchanged!