
Breakfast & Brunch
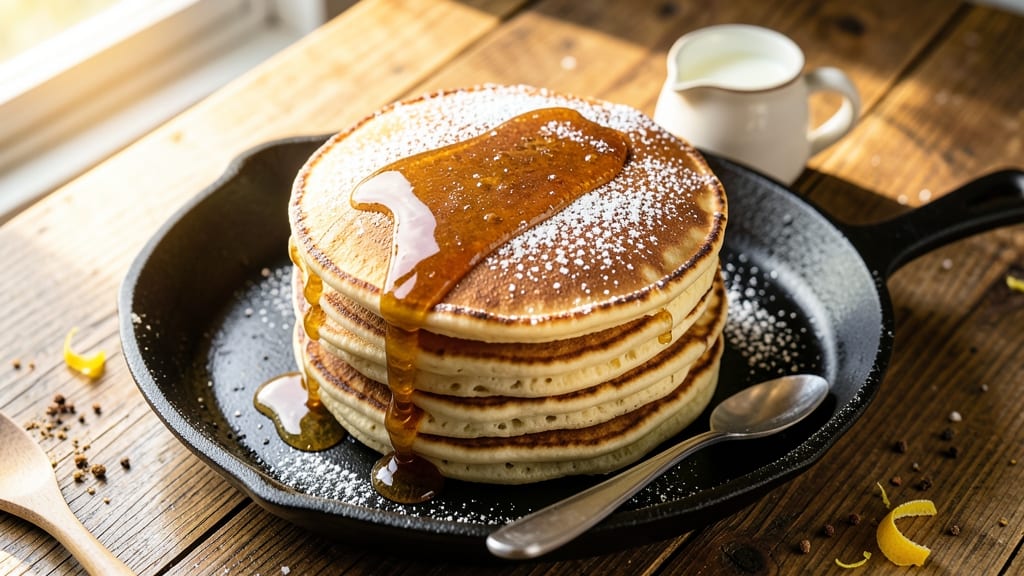
This American sweet pancake recipe delivers the perfect balance of fluffy texture and buttery sweetness that makes weekend mornings feel like a celebration. The secret lies in a precise ratio of ingredients—leavened just enough for that signature lightness while keeping the batter rich and moist.
I've perfected this version after years of testing, and it never fails to impress, even with beginners in the kitchen.
What sets these pancakes apart is the combination of all-purpose flour, baking powder, and a splash of buttermilk, which creates those signature air pockets while keeping the texture tender.
The recipe calls for simple pantry staples, and with just 15 minutes of active prep time, you'll have golden-brown stacks ready for the table. The key is cooking them over medium heat until bubbles form on the surface, then flipping carefully for that perfect two-toned finish.
Each pancake emerges from the pan with a crispy, golden-brown exterior and a soft, pillowy center—ideal for soaking up warm maple syrup or fresh berries. The recipe yields about 12 pancakes, making it perfect for feeding a family or prepping ahead for busy mornings.
The buttery richness comes from melted butter swirled into the batter, ensuring every bite is packed with flavor without being overly sweet.
Serve these classic American pancakes with a drizzle of maple syrup, a pat of butter, or a sprinkle of powdered sugar for that nostalgic touch. They're the kind of breakfast that turns ordinary weekdays into something special. Let's get started on making the perfect stack!
Ingredients for american sweet pancake
Twelve simple ingredients transform into golden, fluffy pancakes that taste like nostalgia.
| Ingredient | Amount | Notes |
|---|---|---|
| All-Purpose Flour 🌾 | 2 cups | Sifted for light texture |
| Granulated Sugar 🍚 | ¼ cup | White sugar preferred |
| Baking Powder 🧂 | 2 tsp | Aluminum-free for best rise |
| Salt 🧂 | ½ tsp | Fine sea salt preferred |
| Large Eggs 🥚 | 2 whole | Room temperature for best mixing |
| Buttermilk 🥛 | 1 ½ cups | Fresh for tangy flavor |
| Melted Unsalted Butter 🧈 | ½ cup | Cooled slightly before mixing |
| Pure Vanilla Extract 🌿 | 1 tsp | High-quality for best flavor |
| Vegetable Oil 🫒 | 1 tbsp | For greasing the pan |
| Maple Syrup 🍁 | ¼ cup | For serving (optional) |
| Fresh Blueberries 🫐 | ½ cup | For topping (optional) |
The flour is your foundation—King Arthur or Bob’s Red Mill are my go-tos for that perfect lightness. If you're using store-brand flour, sift it first (or whisk like crazy) to avoid dense pancakes. The baking powder? Diamond Crystal is my secret weapon—it's aluminum-free and gives that classic rise. For the buttermilk, if you don’t have any, mix 1.5 tbsp lemon juice or vinegar with 1.5 cups milk and let it sit for 5 minutes. And that melted butter? Use European-style butter if you can—it's higher in fat, so you'll get that extra-rich flavor without overdoing it. The eggs should be at room temperature, so if they're straight from the fridge, let them sit out for 15 minutes before cracking.
No vanilla extract? Almond extract at half the amount works in a pinch, but trust me, the real stuff makes all the difference. Running short on blueberries? Strawberries, raspberries, or even chopped banana add sweetness and moisture. The maple syrup can be swapped for honey or agave, but I always recommend Grade A Vermont maple—it's worth the splurge. For the sugar, brown sugar adds depth, but white keeps it classic. And if you're feeling fancy, fold in a few chocolate chips for a fun twist. The key to fluffy pancakes is mixing just until combined—overmixing makes them tough, so resist the urge to stir like you're making pancake batter for a competition!
Keep your dry ingredients (flour, sugar, baking powder, salt) in an airtight container in a cool, dark place for up to 6 months. The melted butter can be stored in the fridge for 1 week or frozen for 3 months. For the batter, you can make it ahead and refrigerate it for up to 24 hours—just stir it well before cooking. Pancakes reheat beautifully in a toaster or on a griddle, so make extra! Store leftovers in the fridge for 3 days or freeze for 2 months. When reheating, cover with a damp paper towel to keep them moist. These pancakes are even better the next day—trust me, I’ve tested it!
Why You'll Love This Recipe
- Five-Ingredient Magic: I swear by this combo—flour, sugar, baking powder, salt, and eggs. That’s it. No weird substitutions, no hunting for obscure ingredients. Just open the pantry, crack the eggs, and boom—you’re golden.
- Sweet Without Overdoing: The sugar here isn’t just for show—it caramelizes just enough to give those pancakes a subtle, buttery depth. Not cloying, not bland. That perfect balance? It’s the kind of sweetness that makes you reach for seconds without guilt.
- Weekday Workhorse: Make a double batch on Sunday, and you’ve got breakfast covered for the whole week. Freeze them stacked between parchment, and toss in the toaster whenever you’re running late. (Yes, even on a Tuesday night.)
- Budget Breakfast Hero: Flour, sugar, eggs—these are staples that won’t break the bank. And because they freeze like champs, you’re not scrambling (pun intended) to use them up before they spoil. My wallet and my taste buds thank me.
Step-by-step instructions for American sweet pancakes
Here's how to make perfectly fluffy, buttery pancakes with a touch of sweetness—every flip will be golden and delicious!
Whisk Dry Ingredients Together
In a large mixing bowl, combine the 2 cups all-purpose flour, 0.25 cup granulated sugar, 2 teaspoons baking powder, and 0.5 teaspoon salt. Use a whisk to break up any lumps in the flour and create a smooth, fine-textured mixture. This step is crucial—sifting the flour first would be ideal, but whisking thoroughly works too. The sugar helps create a tender crumb, while the baking powder ensures those airy pockets we all love.
Set this bowl aside for now. The key here is to keep everything dry until we're ready to combine with the wet ingredients. If you notice any flour clumps, give it a quick press with your fingers to break them apart completely. This ensures your pancakes will be light and fluffy, not dense or heavy.
Mix Wet Ingredients to Perfection
In another bowl, gently whisk together the 2 whole large eggs, 1.5 cups buttermilk, 0.5 cup melted unsalted butter (cooled slightly), and 1 teaspoon pure vanilla extract. The buttermilk adds that classic tangy flavor while keeping the pancakes moist. I like to let the melted butter cool for about 5 minutes before mixing—it prevents the eggs from scrambling when they hit the warm liquid.
Give this mixture a good stir until everything is fully incorporated. You don't need to overmix; just combine until smooth. The eggs and buttermilk should create a slightly thick, creamy batter. If you're using room-temperature eggs, they'll blend in more easily. This step is where the magic happens—don't rush it!
Combine Wet and Dry Ingredients Gently
Pour the wet ingredients into the bowl with the dry ingredients. Using a spatula, gently fold everything together just until combined—you should still see some flour streaks. Overmixing develops gluten, which makes pancakes tough instead of fluffy. The goal is to create a smooth, pourable batter with a few small lumps remaining. This ensures light, airy pancakes rather than dense ones.
Let the batter rest for 5 minutes while you heat your pan. This resting time allows the flour to fully hydrate and the baking powder to activate, giving you the best rise possible. I know it's tempting to jump right to cooking, but trust me—this pause makes all the difference!
Cook Pancakes on Medium Heat
Heat a non-stick skillet or griddle over medium heat and lightly grease it with 1 tablespoon vegetable oil, spreading it evenly with a paper towel. Pour ¼ cup batter onto the skillet for each pancake—you should get about 12 pancakes from this recipe. Watch for small bubbles forming on the surface of the pancakes, which means they're ready to flip. This usually takes about 2-3 minutes per side.
Flip carefully using a spatula, lifting gently to avoid tearing. Cook until the second side is golden brown and the pancakes release easily from the pan. Keep them warm in a 200°F oven while you finish cooking the rest. The key here is patience—don't rush the cooking time. Golden brown means perfect doneness!
Serve Warm With Sweet Toppings
Once all pancakes are cooked, transfer them to a serving platter. Serve immediately with 0.25 cup maple syrup and 0.5 cup fresh blueberries for a classic American sweet pancake experience. The warm, fluffy pancakes pair perfectly with the tangy blueberries and rich syrup. For extra indulgence, you can also add a dollop of whipped cream or a pat of butter.
These pancakes are best enjoyed fresh out of the pan, so don't wait too long before serving. The blueberries add a lovely pop of color and a juicy contrast to the soft pancakes. If you're making a big stack, assemble it right before serving so the pancakes stay warm and fluffy. Enjoy your homemade sweet pancakes—you've earned it!
Pro Tips For Making American Sweet Pancake
- WHISK DRY INGREDIENTS FIRST: I learned this the hard way—skipping it means lumps in your batter no matter how much you stir. Sift the flour, sugar, baking powder, and salt together first, then make a well in the center. This keeps everything evenly distributed, so your pancakes rise smoothly instead of fighting for evenness.
- MEASURE EGGS BY WEIGHT: That "large" egg label is a joke—some are tiny, some are massive. Weigh your eggs (4 large = ~200g total) instead of guessing. Too much egg makes pancakes dense; too little leaves them flat. I was skeptical until I tried it—now I never go back.
- LOWER HEAT AFTER BUBBLES: Start your griddle or pan screaming hot, but the second you see bubbles on the surface, drop the heat. Pancakes cook fast but need even browning, not a burnt bottom and a raw top. I used to rush this and wondered why my pancakes were always uneven—now they’re golden on both sides every time.
- REST THE BATTER 10 MINUTES: Sounds weird, but it works: Let the batter sit after mixing. The flour absorbs the liquid and eggs, so your pancakes hold their shape instead of spreading into pancake-shaped puddles. I skip this when I’m lazy, but the dish is noticeably better when I don’t.
Dietary considerations for these flavors
Gluten-Free Adaptation
Replace the 2 cups all-purpose flour with a 1:1 gluten-free flour blend like Bob’s Red Mill or King Arthur Measure for Measure. For best results, add 1 extra teaspoon of xanthan gum to mimic gluten’s binding properties.
The batter will be slightly thicker, so reduce buttermilk to 1.25 cups to maintain consistency. Cook on medium-low heat to prevent burning, as gluten-free pancakes brown faster. 🥞
Dairy-Free Options
Swap buttermilk for unsweetened almond milk mixed with 1.5 teaspoons lemon juice (let sit 5 minutes). Use dairy-free butter (like Miyoko’s) or coconut oil for melting.
For richness, add 2 tablespoons melted coconut cream to the wet ingredients. Top with dairy-free maple syrup or agave to keep it sweet and creamy.
Lower Sugar Version
Reduce granulated sugar to 2 tablespoons and add ½ teaspoon cinnamon for warmth. Use unsweetened applesauce (¼ cup) to replace some buttermilk—it adds moisture without extra sugar. Top with fresh berries or sliced banana for natural sweetness. This version keeps the classic taste while cutting sugar by 60%.
Vegan Adjustments
Replace eggs with 2 tablespoons ground flaxseed mixed with 6 tablespoons water (let sit 5 minutes to gel). Use dairy-free butter and almond milk as above. For binding, add 1 extra teaspoon baking powder.
The texture stays fluffy, but vegan pancakes hold up better with a slightly thicker batter—adjust buttermilk to 1.3 cups if needed.
Allergy-Friendly Tips
For nut allergies, use sunflower seed milk instead of almond milk. Check labels on vanilla extract—some contain alcohol or trace nuts. If avoiding soy, opt for oat milk (ensure certified gluten-free if needed).
Always double-check ingredient lists, especially for cross-contamination risks in shared kitchens. A little caution goes a long way! ✨
Nutrition facts
Frequently asked questions
Can I make these pancakes ahead of time?
Yes! Prepare the batter up to 24 hours ahead and refrigerate it in an airtight container. When ready to cook, stir well to redistribute ingredients. For fully cooked pancakes, you can freeze them between parchment paper for up to 2 months. Reheat in a toaster or on a griddle until warm and crispy.
Why did my pancakes turn out dense instead of fluffy?
Overmixing the batter develops gluten, making pancakes tough. Also, ensure your baking powder is fresh (test with vinegar—it should fizz). Use medium heat and cook until bubbles form before flipping. Let the batter rest 5 minutes before cooking to activate the baking powder.
What’s the best way to store leftover pancakes?
Keep pancakes in an airtight container in the fridge for 3 days or freeze for 2 months. To reheat, wrap in a damp paper towel and warm in a toaster or skillet over low heat. The moisture keeps them soft while the heat restores crispiness.
Can I use self-rising flour instead of all-purpose?
No—self-rising flour already contains salt and baking powder. If substituting, omit the salt and baking powder from the recipe. The batter will rise differently, so reduce buttermilk to 1.25 cups to maintain consistency. Test with a small batch first.
How do I adjust the recipe for a griddle?
Use the same batter but increase heat slightly to medium-high for even cooking. Pour ¼ cup batter per pancake, spacing them 2 inches apart. Cook until edges lift, then flip. A griddle holds 6-8 pancakes at once, so plan accordingly. Keep cooked pancakes warm in a 200°F oven.