
Desserts
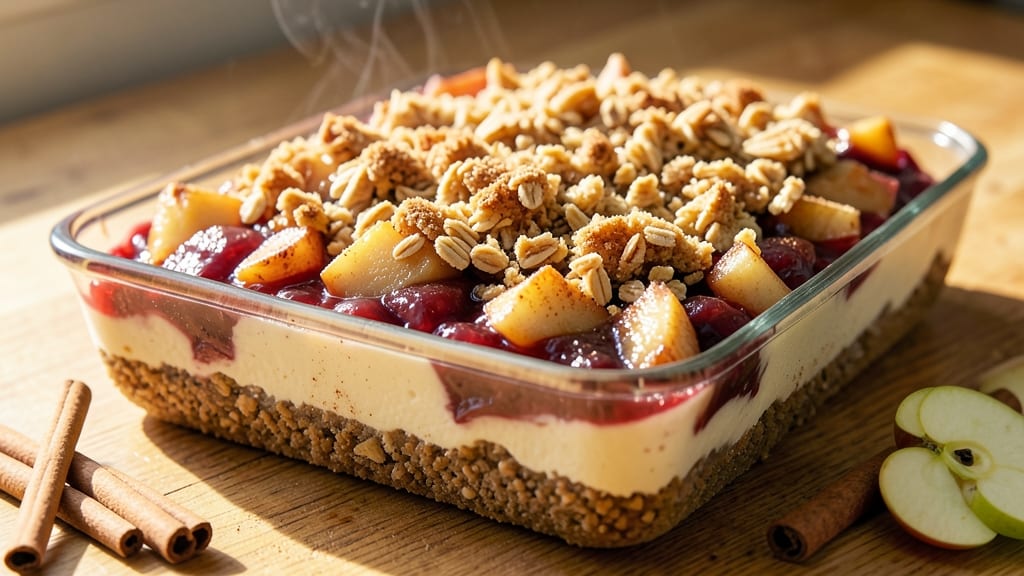
This apple crisp cheesecake bars recipe combines two crowd-pleasing desserts into one decadent treat—creamy vanilla cheesecake layers topped with a buttery apple crisp streusel.
The secret lies in baking the crust first for structural support, then pouring the cheesecake filling over it, and finally crowning it with a warm, spiced apple topping that caramelizes beautifully. 🍏✨ Perfect for potlucks or family gatherings, these bars deliver restaurant-quality texture in every bite: tender crust, velvety cheesecake, and a crispy-sweet apple topping.
The recipe starts with a classic graham cracker crust that stays firm even under the weight of the cheesecake filling. A smooth, lightly sweetened vanilla cheesecake layer—made with cream cheese, eggs, and a touch of sour cream—ensures a rich yet balanced flavor that won’t overpower the apple.
The key to success? Baking the cheesecake layer just until it’s set but still slightly jiggly, so it doesn’t crack when topped with the streusel.
What sets these bars apart is the apple crisp topping—a mix of oats, brown sugar, cinnamon, and diced apples that bakes into a golden, caramelized crown. The apples soften slightly while the streusel stays crisp, creating a perfect contrast in every forkful.
Baked at 350°F for 45–55 minutes, the bars develop a subtle caramelized aroma that fills your kitchen and leaves everyone asking for seconds.
Once cooled and chilled for at least 2 hours, these bars slice cleanly into perfectly portioned squares. Serve them warm with a scoop of vanilla ice cream or dusted with powdered sugar for an elegant finish.
The combination of creamy, crispy, and fruity layers makes this dessert unforgettable—ideal for celebrations or satisfying a sweet craving anytime.
Ingredients for apple crisp cheesecake bars
Sixteen perfect squares of layered dessert magic—creamy cheesecake meets buttery apple crisp.
| Ingredient | Amount | Notes |
|---|---|---|
| Graham Cracker Crumbs 🍪 | 2 cups | Crushed finely for texture |
| Unsalted Butter 🧈 | ½ cup | Cold, cubed for crust |
| Granulated Sugar 🍚 | ¼ cup | For crust sweetness |
| Large Eggs 🥚 | 4 whole | Room temperature for filling |
| Cream Cheese 🧀 | 16 oz | Full-fat, room temperature |
| Sour Cream 🥛 | ½ cup | For creaminess |
| Vanilla Extract 🌿 | 2 tsp | Pure extract preferred |
| Granulated Sugar (Filling) 🍚 | ¾ cup | Balanced sweetness |
| Old-Fashioned Rolled Oats 🌾 | 1 ½ cups | Not quick oats |
| Brown Sugar 🍯 | ¾ cup | Packed for moisture |
| Ground Cinnamon 🌶️ | 2 tsp | For warm spice |
| Diced Apples 🍏 | 2 cups | Honeycrisp or Granny Smith |
| All-Purpose Flour 🌾 | ½ cup | For streusel binding |
| Salt 🧂 | ½ tsp | Kosher or sea salt |
| Powdered Sugar 🍚 | ¼ cup | For dusting bars |
The graham cracker crust sets the foundation. Hobbs or Keebler graham crackers crush best for fine texture—avoid the chunky kind. Unsalted butter is non-negotiable here; salted can make the crust taste flat. Measure your apples precisely: Honeycrisp stays firm while baking, Granny Smith adds tartness. For the cream cheese, let it sit at room temperature for 30 minutes before mixing—this prevents lumps. The filling needs to be perfectly smooth, so use a stand mixer or whisk until no streaks remain. Pro tip: Chill the crust for 15 minutes before adding filling to prevent melting.
No graham crackers? Digestive biscuits or crushed vanilla wafers work in a pinch, though texture will differ slightly. Substitute sour cream with Greek yogurt for tang, but reduce by 2 tablespoons to maintain consistency. Running short on brown sugar? Lightly toasted white sugar mimics the caramel notes. For the apples, if you can't find Honeycrisp, Fuji or Gala are solid alternatives. The cinnamon in the streusel can be swapped for pumpkin pie spice**—just reduce to 1.5 teaspoons to avoid overpowering. And if you're worried about the bars being too sweet, cut the granulated sugar in the filling by 2 tablespoons.
Bars keep beautifully for 5 days in an airtight container at room temperature, though they're best enjoyed within 3 days for peak texture. For longer storage, freeze portions for up to 3 months—wrap individually in plastic wrap before placing in a freezer bag. To serve, let bars sit at room temperature for 10 minutes before slicing for clean cuts. The powdered sugar dusting is optional but adds that restaurant-finish touch. Store any leftovers in the fridge for up to 1 week, though they'll lose some crispness. Prep the crust and filling ahead—they can be assembled up to 24 hours in advance.
Why You'll Love This Recipe
- I’ll be real: cream cheese and butter aren’t cheap, but this recipe stretches them perfectly. A single sheet pan does all the work, and the graham crumbs add that fancy bakery vibe without the price tag. Leftovers? They disappear faster than I can say “second slice.”
- No Mixer Needed: I swear by this recipe because it’s one of those rare desserts that doesn’t require a food processor or mixer. Just mix the cream cheese and butter with a fork—seriously, it’s that simple. The graham cracker crumbs add texture without fuss, and the filling comes together in minutes.
- Caramelized Apple Magic: Honestly, that crispy topping isn’t just sugar—it’s a buttery, cinnamon-kissed layer that turns into a gooey, caramelized blanket over the cheesecake. The apples? They bake into tender, spiced perfection, so you get the best of both worlds: creamy cheesecake and warm apple pie vibes.
- Office Party Hero: Between us, this is my go-to for potlucks or work parties. You can cut it into neat squares, and it’s sturdy enough to travel. Plus, the graham cracker crust keeps it from getting soggy, so it stays fresh for days—perfect for when you’re the one bringing dessert.
Step-by-step instructions for apple crisp cheesecake bars
Layering the perfect balance of creamy cheesecake and buttery apple crisp topping—here's how to assemble them flawlessly.
👨🍳 Step 1: Prepare the Cheesecake Filling
In a large mixing bowl, beat the 16 oz cream cheese and 0.5 cup sour cream together with an electric mixer until completely smooth and creamy. This step is crucial—I press down on the cream cheese with a spatula first to break up any lumps before mixing. Gradually add the 0.75 cup granulated sugar (filling) and mix until fully combined.
Add the 4 whole large eggs, one at a time, mixing just until each is incorporated. Be careful not to overmix after adding the eggs—this can make the bars dense. Finally, stir in the 2 tsp vanilla extract and 0.5 tsp salt. The mixture should be thick but pourable. Here's the thing—room temperature ingredients mix better, so if your eggs or cream cheese are cold, let them sit at room temperature for 30 minutes before starting.
🍳 Step 2: Assemble the Apple Layer and Cheesecake Filling
In a separate bowl, gently toss the 2 cups diced apples with 0.25 cup granulated sugar and 2 tsp ground cinnamon. This sweet-spiced mixture will form the flavorful base of your bars. Spread half of this apple mixture evenly in a 9x13-inch baking dish—you want it to cover the bottom completely.
Pour the cheesecake filling mixture over the apple layer, spreading it evenly with a spatula. Then add the remaining apple mixture on top of the cheesecake layer, pressing down gently to create a uniform surface. This layering ensures every bite has both creamy cheesecake and spiced apple flavors. Tap the baking dish gently on the counter a few times to remove any air bubbles that might have formed during pouring.
🥘 Step 3: Create the Buttery Streusel Topping
In a medium bowl, combine the 2 cups graham cracker crumbs, 1.5 cups old-fashioned rolled oats, 0.75 cup brown sugar, 0.5 cup all-purpose flour, and 0.5 tsp salt. Cut in the 0.5 cup unsalted butter using a pastry cutter or your fingers until the mixture resembles coarse crumbs with pea-sized butter pieces throughout. This texture is what creates that perfect crispy crown.
Sprinkle the streusel mixture evenly over the cheesecake layer, pressing down lightly with your fingers. The reason we press gently is that this helps the topping adhere to the cheesecake and prevents it from sliding off during baking. For extra insurance, I like to use a rolling pin to gently press down on the streusel, making sure to cover every inch of the surface. Finally, dust the entire top with 0.25 cup powdered sugar for that signature sweet finish.
🔥 Step 4: Bake to Golden Perfection
Preheat your oven to 350°F and bake the cheesecake bars for 45-50 minutes, or until the edges are golden brown and the center is just set (it should still have a slight wobble when gently shaken). The top should look beautifully crisp while the filling remains creamy inside. Here's where patience pays off—don't overbake or the cheesecake will become dry and crumbly.
Remove from the oven and let cool completely in the pan for 2 hours before refrigerating. This long cooling period is essential—it allows the layers to set properly and prevents the bars from becoming soggy. Once fully cooled, cut into 16 bars using a sharp knife dipped in hot water between each cut. The bars will keep well in the refrigerator for up to 5 days or can be frozen for 3 months for a quick dessert anytime.
Pro Tips For Making Apple Crisp Cheesecake Bars
- CHILL THE CREAM CHEESE: Mixing cold cream cheese with room-temperature eggs and sugar saves you from a grainy texture—trust me, I’ve scraped enough lumps out of cheesecake fillings to know. Use a stand mixer on low for 2 minutes first, then let the batter sit for 10 minutes before baking. (Yes, even if you’re impatient like me.)
- BROWN THE BUTTER: Skip the plain melted butter in the topping—browned butter adds depth that changes the whole game. Cook the butter over medium-low until it smells nutty (about 5-7 minutes), then whisk it into the sugar while still warm. The extra flavor makes the crisp topping taste like it came from a bakery.
- PRESS THE CRUST FIRM: Don’t just sprinkle graham cracker crumbs over the pan and call it a day. Press them down hard with a flat-bottomed glass or the bottom of a measuring cup—this prevents crumbling and ensures a clean slice. A little extra butter brushed on the pan first helps too, so the crust doesn’t stick when you cut it later.
- BAKE IN STAGES: Start the bars at 350°F (175°C) for 20 minutes to set the bottom crust, then crank the oven to 375°F (190°C) for the final 15-20 minutes. This two-step bake keeps the center creamy while the top gets that perfect golden crunch—no more underbaked goo or overcooked edges. (I learned this the hard way after a batch that wobbled like Jell-O.)
Creative variations of this recipe
Apple Pie Twist
Swap the apple crisp topping for a mini apple pie filling—use 2 cups diced apples, 2 tbsp lemon juice, 2 tbsp cornstarch, and 1 tbsp cinnamon.
Cook until thickened, then spread over the cheesecake layer before adding the streusel. This creates a juicy, custard-like layer that contrasts beautifully with the crisp topping. 🍏
Salted Caramel Swirl
Add a salted caramel drizzle by heating 1 cup caramel sauce with 1 tsp flaky sea salt until melted. Pour over the baked bars before slicing, then chill until set.
The caramel soaks into the cheesecake layer, creating pockets of rich, salty-sweet flavor. Use Kirkland brand caramel sauce for the best texture.
Chocolate-Dipped Edges
For a gourmet touch, dip the edges of each bar in melted dark chocolate before dusting with powdered sugar. Use 70% cocoa chocolate—it balances the sweetness without overpowering.
Let the chocolate set for 10 minutes in the fridge before serving. This adds a luxurious contrast to the creamy filling. 🍫
Spiced Pumpkin Layer
Replace half the apple layer with pumpkin puree—mix 1 cup pumpkin puree with 1 tsp pumpkin pie spice and 2 tbsp brown sugar. Spread this over the cheesecake layer before adding the remaining apple mixture. The pumpkin adds depth and pairs perfectly with the apple crisp topping.
Caramel Apple Cheesecake
Infuse the cheesecake filling with caramel apple flavor by adding 1 tbsp caramel extract (or 2 tbsp caramel sauce mixed into the filling). The extract dissolves seamlessly, giving each bite a subtle buttery caramel note that complements the apple crisp topping. This is a game-changer for caramel lovers! 🍯
Boozy Bourbon Streusel
Elevate the streusel topping with bourbon—add 1 tbsp bourbon to the butter before cutting it into the dry ingredients. The alcohol burns off during baking, leaving behind a warm, smoky depth that pairs beautifully with the apple and cheesecake. Use Maker’s Mark bourbon** for the best flavor. 🥃
Nutrition facts
Frequently asked questions
Can I make these bars without a 9x13-inch pan?
Yes! Use an 8x8-inch pan for smaller portions, but reduce all ingredients by about 25% (adjust baking time to 35-40 minutes). For larger batches, a 10x15-inch pan works—just increase quantities proportionally. The key is maintaining a 1-inch depth for even baking.
Why did my cheesecake layer crack?
Cracking usually happens from overmixing the filling or opening the oven too soon. To prevent it:
- Mix eggs gently until just combined,
- Bake at 350°F until edges are set but center still jiggles slightly, and
- Avoid sudden temperature changes when removing from the oven. If cracks appear, dust with powdered sugar or drizzle with caramel to disguise them!
How do I store leftovers?
Keep bars in an airtight container at room temperature for up to 3 days—they're best enjoyed fresh. For longer storage, freeze individual portions wrapped in plastic for 3 months. Thaw overnight in the fridge before serving. The streusel stays crispy when properly stored, while the cheesecake layer remains creamy.
Can I substitute the graham cracker crust?
Try digestive biscuits, vanilla wafers, or crushed shortbread cookies for a different texture. For a gluten-free option, use almond flour or gluten-free graham crackers**. Just press the alternative crust firmly into the pan to prevent crumbling during baking. The flavor will vary slightly but still work beautifully.
Should I bake the apple layer first?
No—baking the apple layer separately risks making it too soft when combined with the cheesecake. The recipe's method of layering raw apples with the cheesecake filling ensures perfect texture: the apples soften just enough during the 45-50 minute bake while the cheesecake sets properly. This creates that ideal contrast of creamy and crispy in every bite.