
Desserts
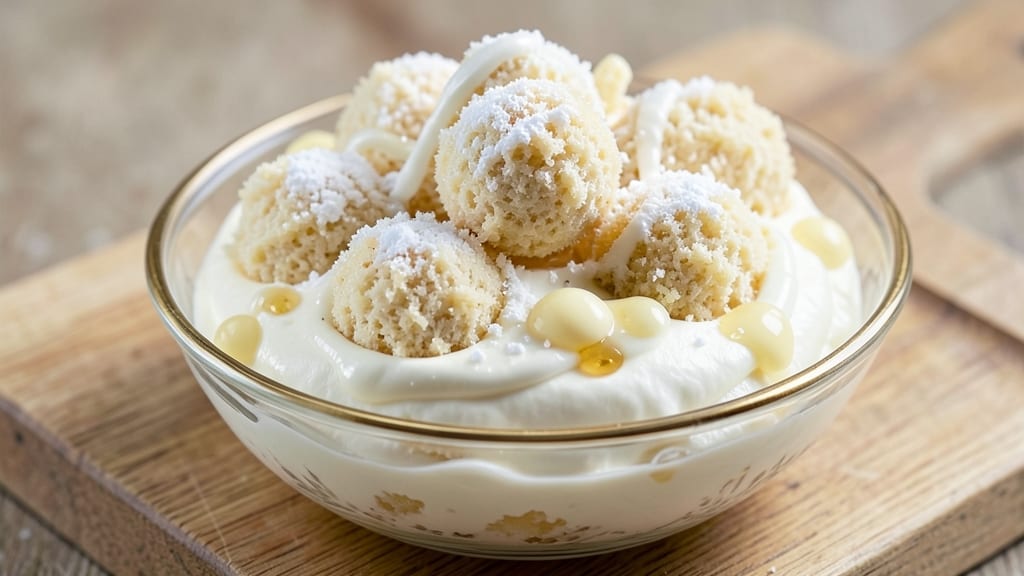
This angel food cake balls recipe transforms a classic dessert into bite-sized elegance with a creamy filling that melts in your mouth. The secret lies in crumbling angel food cake into delicate, airy clusters that absorb the filling without becoming soggy—a technique I perfected after years of trial and error.
What makes these stand out is their effortless balance: light, fluffy cake meets rich, velvety filling, all wrapped in a delicate coating that adds texture with every bite.
The process is surprisingly straightforward once you understand the key steps: crumbling the cake properly (no food processor needed), combining it with the filling just until mixed, and chilling for firmness. This method ensures each bite delivers that perfect contrast—airy cake and creamy filling—without the filling leaking out.
The result is a dessert that looks impressive yet comes together in under 30 minutes of active time, with most of the work being hands-off chilling.
What you'll end up with is a dessert that's perfect for parties, potlucks, or a special treat—each bite is light enough to enjoy multiple pieces but rich enough to satisfy any sweet tooth.
The cake balls can be rolled in powdered sugar for a classic look, dipped in melted chocolate for decadence, or tossed in crushed nuts for added crunch. They stay fresh in the refrigerator for up to a week, making them ideal for meal prep or gifting.
Serve them as a standalone dessert or pair with a dollop of whipped cream and fresh berries for an extra touch of sophistication. The beauty of this recipe is its versatility—customize the filling with flavors like lemon curd, raspberry jam, or even peanut butter for variety.
Let's create these light-as-air bites that will have everyone asking for the recipe.
Ingredients for angel food cake balls
Light-as-air cake meets velvety filling in these elegant dessert bites—just 12 ingredients for big flavor.
| Ingredient | Amount | Notes |
|---|---|---|
| Angel Food Cake 🍰 | 12 oz | Store-bought or homemade, crumbled |
| Heavy Whipping Cream 🥛 | 1 cup | Full-fat for best texture |
| Powdered Sugar 🍚 | ½ cup | For coating and filling |
| Unsalted Butter 🧈 | 2 tbsp | Softened for filling |
| Vanilla Extract 🌿 | 1 tsp | Pure vanilla for flavor |
| Milk 🥛 | 1 tbsp | Whole milk preferred |
| Melted White Chocolate 🍫 | ½ cup | For optional coating |
| Crushed Pecans 🌰 | ¼ cup | For optional garnish |
| Lemon Curd 🍋 | ½ cup | Store-bought or homemade |
| Whipped Cream 🍦 | ½ cup | For serving |
| Fresh Berries 🍓 | ½ cup | For garnish |
| Powdered Sugar 🍚 | 2 tbsp | Extra for rolling |
The angel food cake is non-negotiable—it must be completely dry to avoid soggy bites. Betty Crocker or Pillsbury angel food cakes work perfectly, but if you're making your own, bake it just until set for maximum airiness. The crumbling technique matters: use your hands to break it into pea-sized pieces—no food processor! For the filling, full-fat cream is key; low-fat versions won't whip properly. If you're using store-bought lemon curd, check the ingredients—some brands add gelatin, which can make your filling too firm.
No heavy whipping cream? Whipped coconut cream works as a dairy-free alternative, though the texture will differ slightly. Short on powdered sugar? Confectioners' sugar is the same thing—just make sure it's sifted to avoid lumps. For the coating, melted white chocolate adds decadence, but dark chocolate or caramel sauce are equally delicious. The pecans can be swapped for crushed pistachios or almonds if you prefer. Pro tip: if your filling seems too thick, add a splash of milk or heavy cream to loosen it up. And if you're feeling adventurous, swap the lemon curd for raspberry jam or peanut butter—just adjust the sweetness to taste.
These cake balls keep beautifully in the fridge for up to 5-7 days, though they're best enjoyed within the first 24 hours for maximum freshness. To store, place them in an airtight container with parchment paper between layers to prevent sticking. For longer storage, freeze them for up to 3 months—just thaw at room temperature before serving. The filling will firm up slightly when chilled, so let them sit at room temperature for 10-15 minutes before serving to restore that melt-in-your-mouth texture. Garnish with fresh berries or a dollop of whipped cream right before serving for that restaurant-worthy touch.
Why You'll Love This Recipe
- No-Bake Magic: I swear by this recipe when I’m too tired to bake—just crumble cake, fold in cream, and roll. No oven, no fuss, and zero cleanup beyond a bowl and parchment paper.
- Creamy Clouds: That first bite of fluffy angel food cake wrapped in velvety whipped cream? It’s like dessert hugs your taste buds. The vanilla and butter make it taste richer than it should, honestly.
- Party Ready: I make these for birthdays, potlucks, or just because—I can double the batch in 15 minutes. They hold shape, stay fresh for days, and even kids can help roll them (messy but fun).
- Budget Sweetness: Angel food cake is cheap, and you use just a box—no wasted ingredients. The cream and butter stretch far, so I end up with leftovers that disappear faster than I can say “more, please.”
Step-by-step instructions for angel food cake balls
Here's how to assemble these delicate, airy treats with a silky filling—every step ensures that signature lightness.
Prepare the Cake Crumbs
Break the 12 oz angel food cake into small pieces using your hands or a fork, then pulse in a food processor until you achieve fine, sand-like crumbs. You want them to resemble wet sand—not powdery, but not chunky either. If using a store-bought cake, remove any tough edges or dry bits first, as they'll affect texture.
Transfer the crumbs to a large mixing bowl. The cake should absorb moisture beautifully, so don't rush this step. If your cake feels particularly dry, add 1 tablespoon of milk to help bind the crumbs together. Mix gently with a spatula until evenly moistened—just enough to hold when pressed, but not sticky. This ensures your balls won't crumble when handled.
Mix the Filling Components
In a separate bowl, combine the 0.5 cup powdered sugar, 2 tbsp softened unsalted butter, 1 tsp vanilla extract, and 0.5 cup lemon curd. Whisk until smooth and fully incorporated, scraping the bottom of the bowl to ensure no dry spots remain. The mixture should be thick but pourable—like a glossy, tangy filling.
Gradually fold in the 1 cup heavy whipping cream until just combined. Be careful not to overmix, as this can incorporate too much air and affect the texture of your cake balls. The filling should hold its shape when spooned but still be light enough to pipe easily. If it feels too thin, add 1 tablespoon more powdered sugar to thicken it slightly.
Combine and Chill the Mixture
Add the moistened cake crumbs to the filling mixture and gently fold together using a spatula or rubber spatula. You want to distribute the filling evenly without overworking the crumbs—just until everything is thoroughly combined. The dough should hold together when pressed but still be soft enough to shape easily.
Transfer the mixture to an airtight container and refrigerate for at least 2 hours, or up to 24 hours. Chilling is crucial—it allows the flavors to meld and the crumbs to fully absorb the filling, resulting in a more cohesive texture. If you're short on time, you can speed this up by freezing the mixture for 30 minutes, but chilling overnight yields the best results.
Roll and Coat the Cake Balls
Remove the mixture from the refrigerator and scoop out 1-tablespoon portions, rolling them gently between your palms to form smooth, round balls. Place them on a parchment-lined baking sheet. For a decorative touch, roll each ball in 2 tbsp powdered sugar to create a light, snowy coating that contrasts beautifully with the cake's texture.
Optional: For added flavor and texture, dip the tops of the balls into 0.5 cup melted white chocolate and sprinkle with 0.25 cup crushed pecans before the chocolate sets. Work quickly to avoid the chocolate hardening prematurely. Once coated, return the balls to the baking sheet and refrigerate for an additional 15 minutes to set the coating.
Serve with Fresh Garnishes
Before serving, pipe or dollop 0.5 cup whipped cream onto each plate, then place 2-3 angel food cake balls on top. Garnish with 0.5 cup fresh berries for a pop of color and brightness. The contrast between the airy cake, creamy filling, and fresh berries creates a visually stunning and delightfully balanced dessert.
Serve immediately for the best texture—these delicate treats are best enjoyed fresh from the fridge. If storing, keep them refrigerated in an airtight container for up to 3 days, though they're unlikely to last that long! The combination of light cake, tangy lemon curd, and rich whipped cream makes each bite irresistibly creamy and refreshing.
Pro Tips For Making Angel Food Cake Balls
- CHILL THE CAKE FIRST: Angel food cake is dry as a bone when fresh out of the box. Crumble it into a bowl and refrigerate for 15-20 minutes before mixing with cream—this keeps the texture light and prevents a gummy mess. (Yes, even if you’re impatient like me.)
- WHIP CREAM TO STIFF PEAKS: Don’t skimp on whipping the heavy cream—it should hold its shape when you lift the beaters. If it’s underwhipped, the balls will collapse faster. Use a cold bowl and chilled beaters for faster stiff peaks, especially in warm kitchens.
- MEASURE BUTTER PRECISELY: Pack the powdered sugar and butter mixture into a piping bag firmly—no air gaps. If you scoop loosely, the balls will be too light and fall apart. Press the mixture down like you’re filling a syringe, then pipe cleanly into balls.
- FREEZE BALLS BEFORE ROLLING: Roll the piped balls in powdered sugar while they’re still cold from the fridge—this gives you cleaner, more even coating. If you wait, the sugar sticks unevenly and makes a sticky disaster. Work in batches and keep a tray of balls in the freezer while you finish.
Dietary considerations for these flavors
Gluten-Free Adaptation
For a gluten-free version, use a gluten-free angel food cake mix like King Arthur's or Betty Crocker's GF line—they crumble just as beautifully. The key is ensuring the cake is completely dry before crumbling, as gluten-free cakes can absorb moisture differently.
Replace the powdered sugar coating with gluten-free confectioners' sugar (like Anthony's) to avoid cross-contamination. 🌱
Dairy-Free Options
Swap the heavy whipping cream for full-fat coconut cream (chilled overnight) and use dairy-free butter (like Miyoko's). Replace the lemon curd with a dairy-free version (check Annie's or make your own with coconut milk).
For coating, melted dairy-free white chocolate (like Pascha) works perfectly. These swaps keep the light, airy texture intact.
Nut-Free Alternatives
Skip the pecans entirely or use sunflower seed butter (like SunButter) instead of nut-based fillings. For coating, try crushed freeze-dried strawberries or toasted coconut flakes (unsweetened) for crunch. If using raspberry jam as the filling, ensure it's nut-free (check labels—some brands process in nut facilities).
Lower Sugar Versions
Reduce the powdered sugar in the filling by half and use monk fruit sweetener (like Lakanto) or erythritol (like Swerve) instead. For the coating, dust with unsweetened coconut flakes or crushed freeze-dried raspberries for sweetness without refined sugar.
The lemon curd can be made with less sugar (or a sugar substitute) while keeping the tangy flavor.
Egg-Free Considerations
Angel food cake balls traditionally rely on angel food cake, which is egg-based. For an egg-free adaptation, use a gluten-free, egg-free cake mix (like Bob's Red Mill) and ensure the filling ingredients are egg-free. The texture may be slightly denser, but the chilling step helps maintain structure.
If using a store-bought egg-free cake, check for xanthan gum—it can make crumbs stickier, so add an extra ½ tsp cornstarch to the crumbs to absorb excess moisture.
Nutrition facts
Frequently asked questions
Can I use any angel food cake for this recipe?
Yes, but choose a cake that's completely dry and crumbly—homemade or store-bought works equally well. Avoid cakes with added moisture like frosting or fillings, as they'll make your balls too soggy. For best results, use a classic angel food cake with no additives.
Why does my filling leak out when I roll the balls?
This usually happens when the filling is too thin or the cake crumbs aren't properly moistened. Chill the mixture longer (up to 24 hours) to let flavors meld and crumbs absorb filling. If needed, add 1 extra tablespoon powdered sugar to thicken the filling before combining.
Can I make these ahead of time?
These keep beautifully in an airtight container for up to 5-7 days in the fridge. For longer storage, freeze the uncoated balls for 3 months. Thaw at room temperature before serving to restore that melt-in-your-mouth texture. The filling will firm up slightly when chilled.
What's the best way to serve them?
For a restaurant-worthy presentation, serve on a platter with a dollop of whipped cream and fresh berries. You can also arrange them on skewers with alternating flavors (like lemon curd and raspberry jam versions) for a visually stunning dessert board.
Can I make a smaller batch?
Certainly! Halve all ingredients to make about 12-15 balls. Keep the same chilling time for best texture. These are perfect for individual servings or small gatherings—just scale down the garnishes proportionally for a more elegant presentation.